|
The first time you access the iDCRI website, install the Citrix Web Client software on your computer.
If the computer you are using has Windows 8 or 8.1, download and follow the instructions in this quick reference guide (PDF). If the computer has Windows 7, follow the steps in the table below.
| TASK | STEPS |
|---|
| Installing the Citrix client on Windows 7 |
The following is specific to Internet Explorer 11. Adjust steps, as needed, if you are using a different version.
 In Internet Explorer, click the Tools icon In Internet Explorer, click the Tools icon
 in the upper right.
A menu appears. - Select Safety.
A submenu appears. - Ensure ActiveX Filtering does not have
a checkmark to the left of it. If it does,
click it to clear the checkmark.  Point your browser to connect.dcri.org. Point your browser to connect.dcri.org.The DCRIconnect portal page opens.
- On the list of applications, click CITRIX IDCRI.
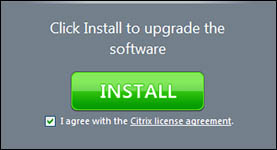
The iDCRI software install page appears. 
- Hover your cursor over Citrix license agreement, and then read the text in the pop-up window.
- Select I agree with the Citrix license agreement.

- Click Install.
Wait for an information bar to appear across the bottom of the page. 
Click Run. - If the Windows User Account Control message appears, click Yes.
 The Citrix online plug-in installation dialog updates you The Citrix online plug-in installation dialog updates you
on the progress of the installation.
Wait for a success message to appear. 
Click OK.  Wait for the iDCRI Welcome screen to appear. However, If the Installation screen remains with a message of Look for an information bar, click Skip to Log on. Wait for the iDCRI Welcome screen to appear. However, If the Installation screen remains with a message of Look for an information bar, click Skip to Log on.- After the iDCRI Welcome screen appears, proceed to Logging on to iDCRI/Citrix.
|
|
 In Internet Explorer, click the Tools icon
  in the upper right.


 The Citrix online plug-in installation dialog updates you
 Wait for the iDCRI Welcome screen to appear. However, If the Installation screen remains with a message of Look for an information bar, click Skip to Log on.