Cisco Anyconnect, also seen as Cisco AnyConnect Mobility Client, provides a virtual private network connection so you can remotely access DCRI network resources and, if applicable, a Virtual Machine (VM) or the Desktop of a DCRI-issued Windows computer at your desk in a DCRI facility.
This is a OSX application you start by clicking an icon or shortcut on your computer and, unlike iDCRI/Citrix is not a web application you open in a browser.
If needed, install the application. After installation, log on using the following steps.
- To start, open Cisco AnyConnect Secure Mobility Client. This application can be found:
- In the Launchpad.

- Under Finder>Go>Applications>Cisco AnyConnect Secure Mobility Client (in the Cisco folder).

- On the Dock, if you placed it there.
- With an Alias, if you created one.
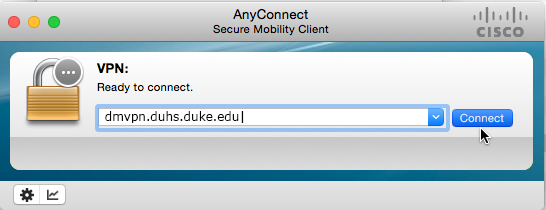
The Cisco AnyConnect Secure Mobility Client dialog opens.

- In the Launchpad.
- Ensure the address in the combo box is:
dmvpn.duhs.duke.edu
Note: This is a different address from the one provided by the installer. - Click Connect.
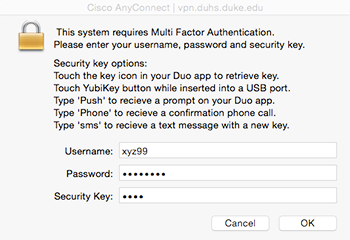
The Cisco AnyConnect dialog opens. - In the logon dialog, enter your Username (NetID) and network Password.

- In the Security Key field (this field might appear as Second Password), enter your choice of Multi-Factor Authentication.
If you have a YubiKey code, Duo Mobile code (by tapping the app’s key icon), or an unused SMS (Short Message Service) code, enter it into this field. Otherwise, you are expected to enter one of the following words:- Enter phone to have the system call the top phone you listed on the Duke Office of Information Technology (OIT) MFA website. You can enter phone2 or phone3 to have the system call the second or third phone on your list.
- Enter push to have the system push notification to the Duo Mobile app on the top smartphone or tablet you listed in the OIT website. You can enter push2 or push3 to send to the second or third device on your list.
- Enter sms to have the system send you a batch of passcodes. Enter one of them into this field to authenticate this session.
- Click OK.
 The dialog closes as a secure icon (see right) appears on the Dock. Proceed to Working in Cisco AnyConnect.
